

Why a Running Toilet Deserves Prompt Attention
A toilet that runs continuously can waste a significant volume of water - in some cases, several thousand gallons per month depending on the severity of the leak. Beyond the environmental impact, that waste shows up on your water bill every single cycle. The good news is that the underlying causes are almost always mechanical and straightforward to address yourself.
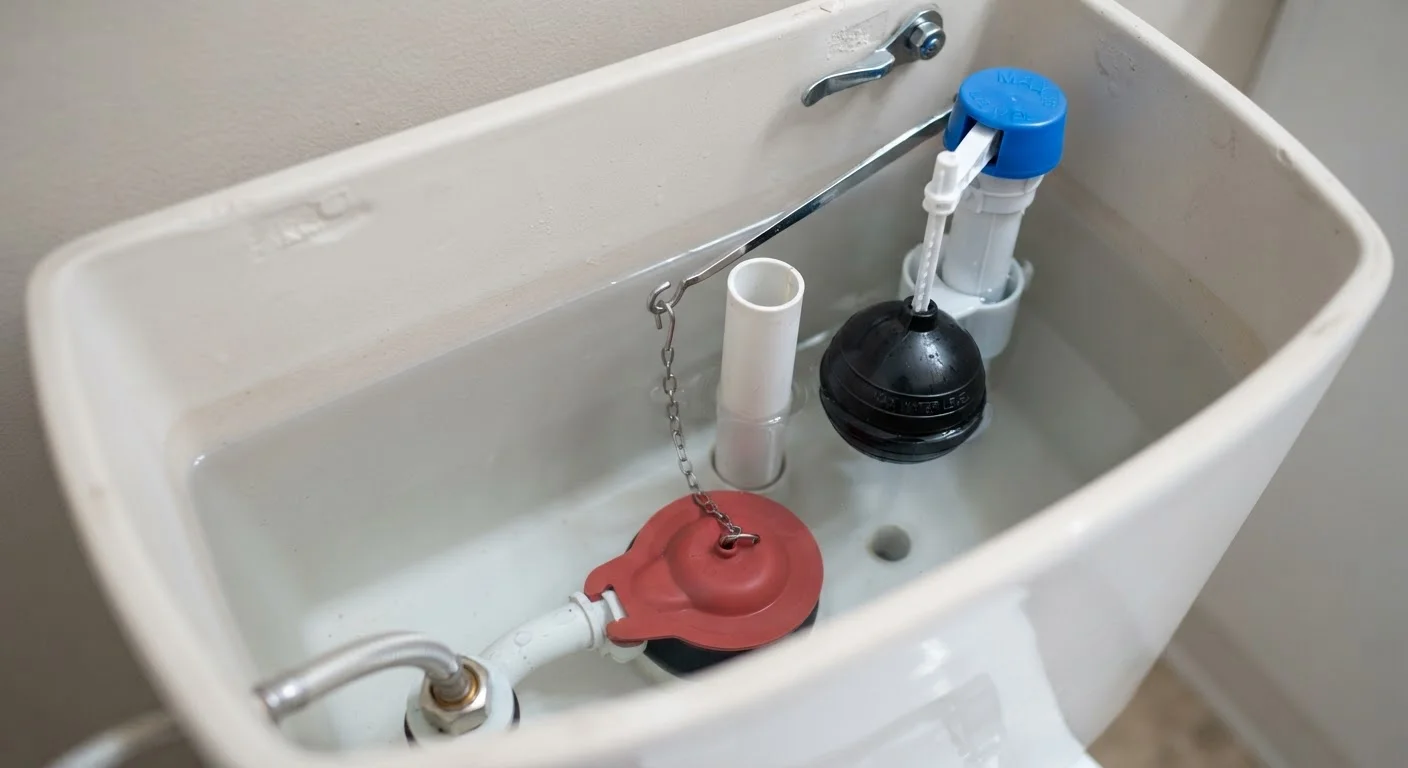
Inside every standard toilet tank, just three components do most of the work: the flapper (a rubber seal that controls water flow from tank to bowl), the fill valve (which refills the tank after a flush), and the float (which signals the fill valve to stop when the tank is full). When any one of these wears out or drifts out of adjustment, the toilet runs. Understanding which part is misbehaving before you buy anything saves both time and money - see our guide on repairing vs. replacing for a broader look at when DIY fixes make financial sense.
Food Coloring Test Confirms a Leaking Flapper
Add a few drops of food coloring to the tank water and wait 10-15 minutes without flushing. If color appears in the bowl, the flapper is leaking and needs replacing. This simple test prevents buying the wrong part.
What You'll Need Before You Start
This repair requires no specialist plumbing knowledge. You'll want to gather a few items before lifting the tank lid so the job moves efficiently. Note that you may not need all replacement parts - diagnose first, then buy only what the repair calls for.
Adjustable pliers
Used to loosen and tighten the fill valve locknut under the tank.
Sponge and towel
Absorbs remaining water from the tank after shutting off the supply.
Replacement flapper
Replaces a worn or warped flapper that is letting water seep into the bowl.
Replacement fill valve
Replaces a noisy or malfunctioning fill valve that runs continuously.
Food coloring
Used to confirm whether the flapper is leaking before purchasing parts.
What you will need
If your toilet is very old, shows signs of tank cracking, or has corroded internal hardware throughout, it may be worth weighing a full replacement rather than patching aging components. Common myths about water leaks can also help you separate minor nuisances from issues that genuinely need professional attention.
Turn Off Water Before You Begin
Always shut the supply valve - the small oval knob located on the wall behind or below the toilet - before opening the tank or touching any internal components. Failure to do so can result in water spraying or an overflowing tank. If the supply valve is corroded or won't turn, call a licensed plumber rather than forcing it.
Step-by-Step Repair Instructions
Follow each step in order. If at any point you encounter corroded pipes, cracks in the tank, or a supply valve that won't cooperate, stop and contact a licensed plumber - those situations go beyond routine maintenance.
Diagnose the problem
Remove the tank lid and set it safely aside on a flat surface - porcelain cracks easily. Listen and look: if water is trickling into the bowl, the flapper is the likely culprit. If the fill valve hisses or runs intermittently, the valve or float needs attention. Perform the food coloring test to confirm a flapper leak before buying anything.
Shut off the water supply
Turn the supply valve clockwise until it stops. Flush the toilet once to drain most of the tank. Use a sponge to soak up any remaining water so you have a dry working environment. Place a towel on the floor around the base in case of drips.
Replace the flapper
Unhook the old flapper from the pegs on either side of the flush valve and detach the chain from the flush handle arm. Take the old flapper to the hardware store to match the size and shape, or note your toilet's brand to find the right fit. Snap the new flapper onto the pegs, attach the chain with about half an inch of slack, and confirm the flapper seats flat over the flush valve opening.
Adjust or replace the fill valve
If the fill valve hisses continuously or water rises above the overflow tube, first try adjusting the float. On a ball-float design, gently bend the float arm slightly downward so the float shuts off the valve sooner. On a cup-float design, pinch the clip or turn the adjustment screw to lower the float along the fill valve shaft. The water level should sit about one inch below the top of the overflow tube.
If adjustment doesn't stop the noise or running, replace the fill valve entirely. Turn off supply, remove the remaining water with a sponge, disconnect the supply line, unscrew the locknut under the tank, and lift out the old valve. Install the new valve according to its instructions, set the height so the critical level (CL) mark sits one inch above the overflow tube, and hand-tighten the locknut.
Restore water and test
Reconnect the supply line if you removed it, then slowly turn the supply valve counterclockwise to restore water flow. Watch the tank fill and confirm the fill valve shuts off cleanly when the water reaches the correct level. Flush once and observe: the flapper should lift fully, drop cleanly, and seal without any water trickling into the bowl afterward. Repeat the food coloring test after 10 minutes to confirm no leak remains.
Avoid Over-Tightening Replacement Parts
Toilet tank components are designed for hand-tight installation. Using pliers or wrenches to over-tighten a fill valve locknut or flapper ring can crack the porcelain tank, turning a simple repair into a costly replacement. Snug is enough - stop when there is no wobble or leak.
Once your repair is complete and you've confirmed no leaks, replace the tank lid carefully. Monitor the toilet over the next day or two to make sure it stays quiet between flushes. If the running resumes, a second diagnostic pass - focusing on the fill valve adjustment - usually resolves it.
The content provided on our blog site traverses numerous categories, offering readers valuable and practical information. Readers can use the editorial team’s research and data to gain more insights into their topics of interest. However, they are requested not to treat the articles as conclusive. The website team cannot be held responsible for differences in data or inaccuracies found across other platforms. Please also note that the site might also miss out on various schemes and offers available that the readers may find more beneficial than the ones we cover.